By default the Android emulator does not have an SD card enabled. I was looking for this while I tried to save some images which I viewed on the Android browser within the emulator. The emulator told me that it can not download / save the image because there is no SD card installed. Well, I would also save this on the phone’s memory … but it seems the emulator / Android OS does not like that.
However, enabling the SD card is compared to other device simulators quite cumbersome but it works and if you did it once it is pretty easy though. In the end it is a runtime configuration (additional parameter) to start the emulator with an SD card image file. So this needs to be done just once for each runtime / debug configuration in Eclipse. I just made that and it works fine. As I am using Mac OS X & Eclipse the following examples are for this platform. If you are running Linux or Windows you might need to adjust the paths but it should be fairly easy.
1. Create an SD card image file
In the command line you just enter the following commands:
$ cd /Developer/android-sdk-mac_x86-1.0_r1/tools/
$ ./mksdcard 256M /Users/YOUR_USER_NAME/Documents/workspace/android_sdcard
You can now check if the file has been created but if there is no error it should be there. You can also adjust the size if you want to have a smaller SD card image or even a bigger one. 😎
2. Tell your Android emulator you want to start with that SD card image file
Therefor, go to: “Debug » Debug Configurations… » [select or create an Android Application debug configuration] » Target” and enter at “Additional Emulator Command Line Options” the following:
-sdcard /Users/YOUR_USER_NAME/Documents/workspace/android_sdcard
Unfortunately, the Android debugger setup (at least in SDK 1.0 R1) does not take eclipse variables like ${workspace_loc} and therefor we need the full path in here. Anyway, this might look like:
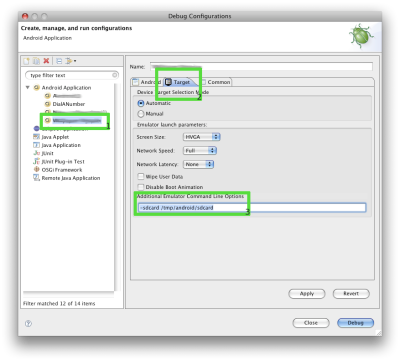
That’s it. Hit “Apply” and then “Debug” to start the emulator with your SD card.
Note: If your emulator is still running from the last test please close it first.
http://www.androidph.com/2008/11/camera-capture.html
This is a tutorial for setting up an SD Card and saving images capture from a Camera device to Media.EXTERNAL_CONTENT_URI.
On my (Windows Vista) machine at least, the sdcard image had to be larger than 8M (the emulator crashed with an image of 8MB, even though mksdcard claims that this should work).
I added a blog entry about how to mount the SD card image under Linux:
http://blog.jayway.com/2009/04/22/working-with-sd-cards-in-the-android-emulator/
Could be good if you want to put or get content from it.
A little gotcha…
After I created the SD Card and updated the debug configuration, Logcat stopped generating output. Shutting down the emulator, restarting eclipse fixed the problem.
Great work… Thanks…!!!
Hi! i’ve got a problem while i look for in target the additional command line, i not found it, i haven’t find in the web something that can help me. So, any help? My Eclipse version don’t show the additional command line in the target tab.
@Susto:
Resizing your target tab-window will reveal the additional command line 😉
After Uploading Audio/Video/Images in sdcard, if it is not displayed in Gallery.
Click on Dev tools–>Media Scanner. It will display scanning is finished, now if you click gallery You can see Video and Pictures.
If you want to view Audio click “Music” icon.
Thanks,
Vinoth.
in creating of sdcard i got error segmentation fault in terminal,please any one give solution to create sdcard
tkanking u in advance
I like your site and i too have a site in the same niche, would you consider a link exchange with a PR 3 Site ? If so do let me know. prefer the link to be do follow. Thanks.
The mksdcard command will create a new binary file. The ‘file’ parameter you give it should be a new file that it will create. Do not give it a parameter to an existing directory. This will cause a seg fault.
I like your site and i too have a site in the same niche, would you consider a link exchange with a PR 3 Site ? If so do let me know. prefer the link to be do follow. Thanks.
I appreciate your blog because of unique content and informative post. Thanks for sharing that.
thanks